Quantcast
Channel: the RPF - Studio Scale Models
Viewing all 974 articles
Browse latest View live

Probe Droid, bigger, better, faster, stronger and lasts much longer.

$
0
0
I think its about time to put all that info into one build now, its my 3rd Probe Droid and hopefully my last..... Off to evil bay for V2 and onto the bench for V3

With the new ref and finds I hope to finally put this beast to rest, still some parts to find though and thats the challenge ........something to keep my mind off the other stupid build I've got going on


Please help identified this modelkit parts!

$
0
0
Hi all,
I am looking for this modelkit parts:


Can anyone identified it? The Cylinder part looks to me from an Motorcycle and the other one are a cover or hatch.

Many thanks

5 ft. Falcon. It can be done.

$
0
0
I want to start a new discussion about the possibility of a 5ft Falcon. I have heard rumblings around here for years about maybe a 5ft Falcon kit coming but as of today there has been nothing but a few pieces as far as I know.

With 3D printing and amazing artists like SteveStarkiller, Tony, etc. it is very doable. If you look at the parts being made for the new 29" Hasbro it is just incredible.

Surely someone here can make a base Falcon. Either plans so we can make our own or a kit. Then Tony, who is doing incredible work on Shapeways, along with Steve here and many others can make the various parts and people can then offer resin versions, upgrade as they can, etc.

I really don't see why a 5 footer would be that hard to do.

And before anyone says it just can't be done, that is what everyone said about the Ark project and it's now on it's way to get it's lovely gold finish.

I invite doubters to look below at pg.16 post #154 and then back on pg. 14 post 131:

http://forum.rebelscum.com/t1098610-16/

What we need is basically a kit or plans for a blank Falcon. Even if someone could just produce plans for the pieces for a blank 5 footer shell then all our various master artists could do the details through Shapeways.

The parts can be offered there and then used to make resin offerings that are less expensive just like is happening with the 29" Falcon.

Even if someone could just break the basic blank hull into pieces and proper measurements then even I could cut and assemble them into a 5ft "blank" Falcon, and I am not nearly as good at props and models as many here. I am guessing it would not take long for someone to come up with a plan for the inner skeleton support as well. Again just look at what is available for the 29" Falcon once we got a base to work with.

The 5 footer is the last big thing I would like to see that has not been done. I think a lot of members feel the same.

It can be done.

Chris Kelley X1

AMAZING NEW PICS of the Big E getting refurbished!

Question about tie fighter

$
0
0
Not sure if this is the correct place for this but I was hoping someone could help me.im looking for a model and or part list that ilm used to create a tie fighter.amy help would be much appreciated.

SS A-Wing Hull Patterns and build

$
0
0
Been working on this for about a month on and off. Pics coming soon.....:D

aurora sealab resin castings?

$
0
0
hi!
anyone has resin castings of the aurora sealab parts?
thanks!!

Molding the Entex Porsche

$
0
0
This post is going to be multi-part and long, but I want to tell the story, hopefully help others, and hear feedback. If you don’t like the wall of text just skip it and look at the pictures. :p

A couple of months ago I got the opportunity to cut up an Entex Porsche body and make molds for the Slave I parts. It seemed simple enough, drop the parts in RTV, pour resin. Right? Let’s go!

Then I started studying the Entex parts and doing some math. Traditional block molds for the rear fenders would require 12+ pounds of RTV! The front fenders need 10 pounds more! The doors need 4 pounds and the bumper3. At this rate the molds would cost as much as the model! What had I gotten myself into? :wacko

I started to try and figure out a way to use less RTV, focusing on the rear fenders. My first idea was make a custom mold box that would follow the curves of the body instead of a cube shaped box. It turns out that did not help much because the rear wheel well sticks out so far and creates lots of negative space. Then I found a tutorial on the Smooth-On website about cavity pour molds. That would be the solution, but they used Plasti-Paste for the shell. It looked simple enough but looked like a mess. I had never used it and I did not want to learn on this job. Instead, I clayed up the part, put another layer of clay over the whole thing (cavity space) and then vac formed over that with .06 styrene.


After the shell was created I removed the cavity clay.
A pour hole was cut and several vents were drilled and extended with drinking straws. The shell was centered over the rear fender and bolted down through a sheet of scrap ABS that I had laying around. I used some old MoldStar-16 silicone to seal everything up. Lots of people use hot glue for the seal, but that stuff makes a mess. The old RTV worked great and was probably headed for the trash anyway.

The first part poured and curing.


Clay removed.


Measuring how much silicone will be need for the second parts.
I measured the first part the same way, but the pictures look like crap. The plastic beads are like what is inside beanie babies.


Poured second part. Not pretty, but it works.


I had planned on pressure casting these…uh oh.


I have a 2.5 gallon pressure pot. A pressure pot big enough would really bust the budget.
Okay, I will try the part without pressure. It turned out pretty good. There are some bubbles on the top edges, but all of them can be easily filled, some of them will be trimmed off for the Slave part and others will be hidden so deep in the ship body they will never even be seen anyway.

Raw casting.


Other parts to follow.

Hero Tie Questions

$
0
0
Hi guys working on a hero tie and want to know what size T to use for the wing star spars? I want to make sure I put the right size because the T don't come with the kit

Five Foot Falcon Armature

$
0
0
Hi Guys,
Didn't want to hijack the great thread of Andre and Maruska. Just been playing around with an armature design for the 5 footer. The pictures show 1/8 aluminum plate for the formers. They could be made from thicker plywood as well. I may need some diagonal formers at the intersections, but it may already be overkill, LOL. I'm showing 2 1/4 inch aluminum pipe for the mountings. It will allows the model to be mounted from 6 different points. May never get around to building another large model, but doesn't hurt to piddle in Lightwave a bit, :) I'm rebuilding the model that Andre provided in Lightwave format. It's what I'm used to using. These guys have been awesome in sharing all this great info. Just wanted to contribute a little if possible. Let me know how it could be improved, I ain't no engineer, LOL, Cheers,

Joe


Click image for larger version. 

Name:	Armature Design 1.jpg 
Views:	121 
Size:	838.8 KB 
ID:	436621

Click image for larger version. 

Name:	Armature Design 2.jpg 
Views:	84 
Size:	1.30 MB 
ID:	436618
Attached Thumbnails
Click image for larger version. 

Name:	Armature Design 2.jpg 
Views:	N/A 
Size:	1.30 MB 
ID:	436618   Click image for larger version. 

Name:	Armature Design 1.jpg 
Views:	N/A 
Size:	838.8 KB 
ID:	436621  

Star Wars Studio Model Closeups

Help with supports/stands for x-wings

$
0
0
Hi all,
i was hoping you guys could help with suggestions for mounting x-wing armatures, I have a captain cardboard and a Nexus Models x-wing and I'm struggling to find a mount to fit the armatures. The Nexus x-wing has the kit armature (excellent model) and the captain cardboard x-wing has the Mike Reader aluminium armature. Any help would be greatly appreciated.

The Mike Reader armature is 3/8"-16 UNC the Nexus is meant to be 6mm but I bought a camera mount with 6 mm bolt but it's to small. Thanks in advance guys and gals.

Entex StuG part help

$
0
0
Hi,

I'm currently rebuilding the Turbo Laser and need some help from you guys.
My old version was oversized and all dimensions are remeasured/rescratchbuild...

Firstly, I used Bandai StuG for my old version, however, it was originally from Entex StuG as the attached.

If someone has any casting or original part, please let me know~

Thanks,
Eric.
Attached Thumbnails
Click image for larger version. 

Name:	image.jpg 
Views:	N/A 
Size:	101.3 KB 
ID:	437105   Click image for larger version. 

Name:	image.jpg 
Views:	N/A 
Size:	643.2 KB 
ID:	437106  

New build

$
0
0
Took a bit of a break from the bird of prey build.
Making upgrade parts for the big Hasbro X Wing


TIE Bomber

$
0
0
I always wanted a studio scale but thought the getting parts bit would be too much trouble, but then I stumbled upon Rafael Mateo García TIE Bomber schematics here. Figured the most important parts came from the leopold and MPC Vader. So now I've got the MPC, two leopolds and one karl mörser a hopefully soon two saturns. I think that will get me to where I want.

Click image for larger version. 

Name:	16494617302_0803ba3d16.jpg 
Views:	75 
Size:	81.4 KB 
ID:	437429

Click image for larger version. 

Name:	16495619955_36b252876c.jpg 
Views:	60 
Size:	133.8 KB 
ID:	437431

Thanks for looking!
Attached Thumbnails
Click image for larger version. 

Name:	16494617302_0803ba3d16.jpg 
Views:	N/A 
Size:	81.4 KB 
ID:	437429   Click image for larger version. 

Name:	16495619955_36b252876c.jpg 
Views:	N/A 
Size:	133.8 KB 
ID:	437431  

EFX X-Wing Base dimensions

$
0
0
Hi guys. anyone with the measurement for the rectangular mirror base they offered with the x-wing?


thanks in advance. :)


So, who's got the best Nautilus kit these days?

$
0
0
Like it says. Looking for a good Nautilus kit. Bigger the better!
Been out of the loop on these for years...

-Rylo

Salzo V4 X-Wing Build

$
0
0
Hello all, I decided to start my own build thread instead of continuously hijacking Mike's Official V4 Info thread.

Progress will be slow since I'm working on other projects and X-wing research occupies about 3/4 of my build time right now.
This is my first X-wing AND my first resin kit, so I suspect this will be more of a learning experience than anything else.
My hope is to complete a nice looking Red 5 with functional wings and fiber optic lighting that I can pose on an armature and admire.

I've read many of the X-wing threads on the RPF and other modeling sites and collected a great deal of reference material.
Thanks to all the veteran builders for sharing your knowledge and pictures!
With all the research, I'm beginning to understand the phrase "X-wing nutter" with regards to paint color debates, photographic perspective and minutia detail.
I'd like my build to be as screen accurate as possible without sacrificing fun in the process.
I'll likely be making mistakes, so comments and advice are welcome.

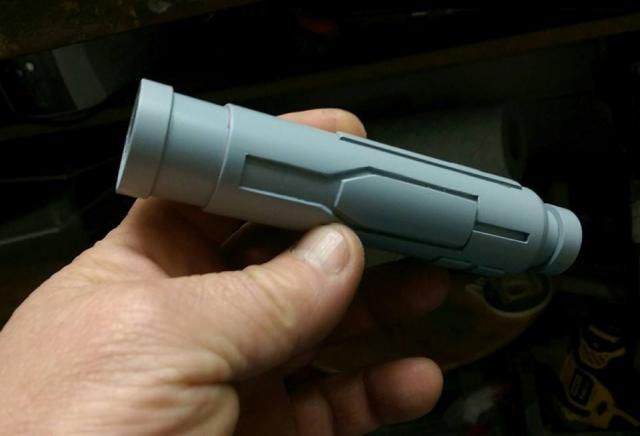
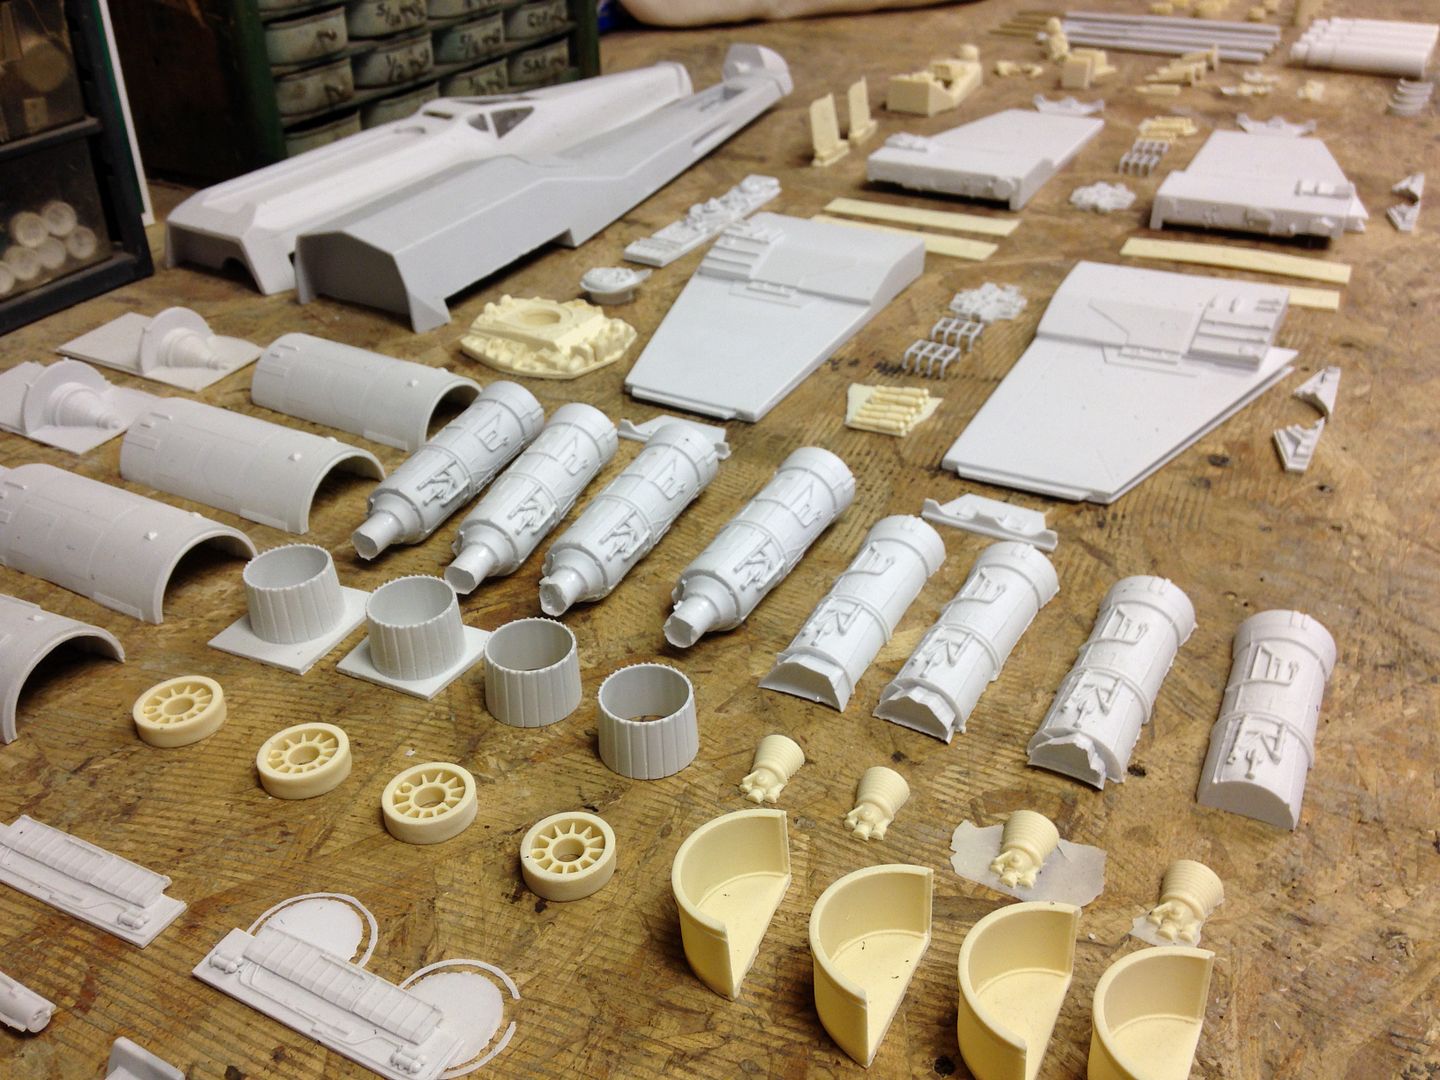
Here goes! First, I unboxed and laid out all the V4 parts. Staring at the contents, I have to wonder if I'm in over my head?
I count 146 parts (including landing gear). Since I've never built a resin kit, I can't make any comparisons, but my understanding is this is a very nice kit.
The details are crisp and the resin is nice. Air bubbles are virtually non-existent. I usually work with metal, but I'm finding resin is a lot more relaxing.


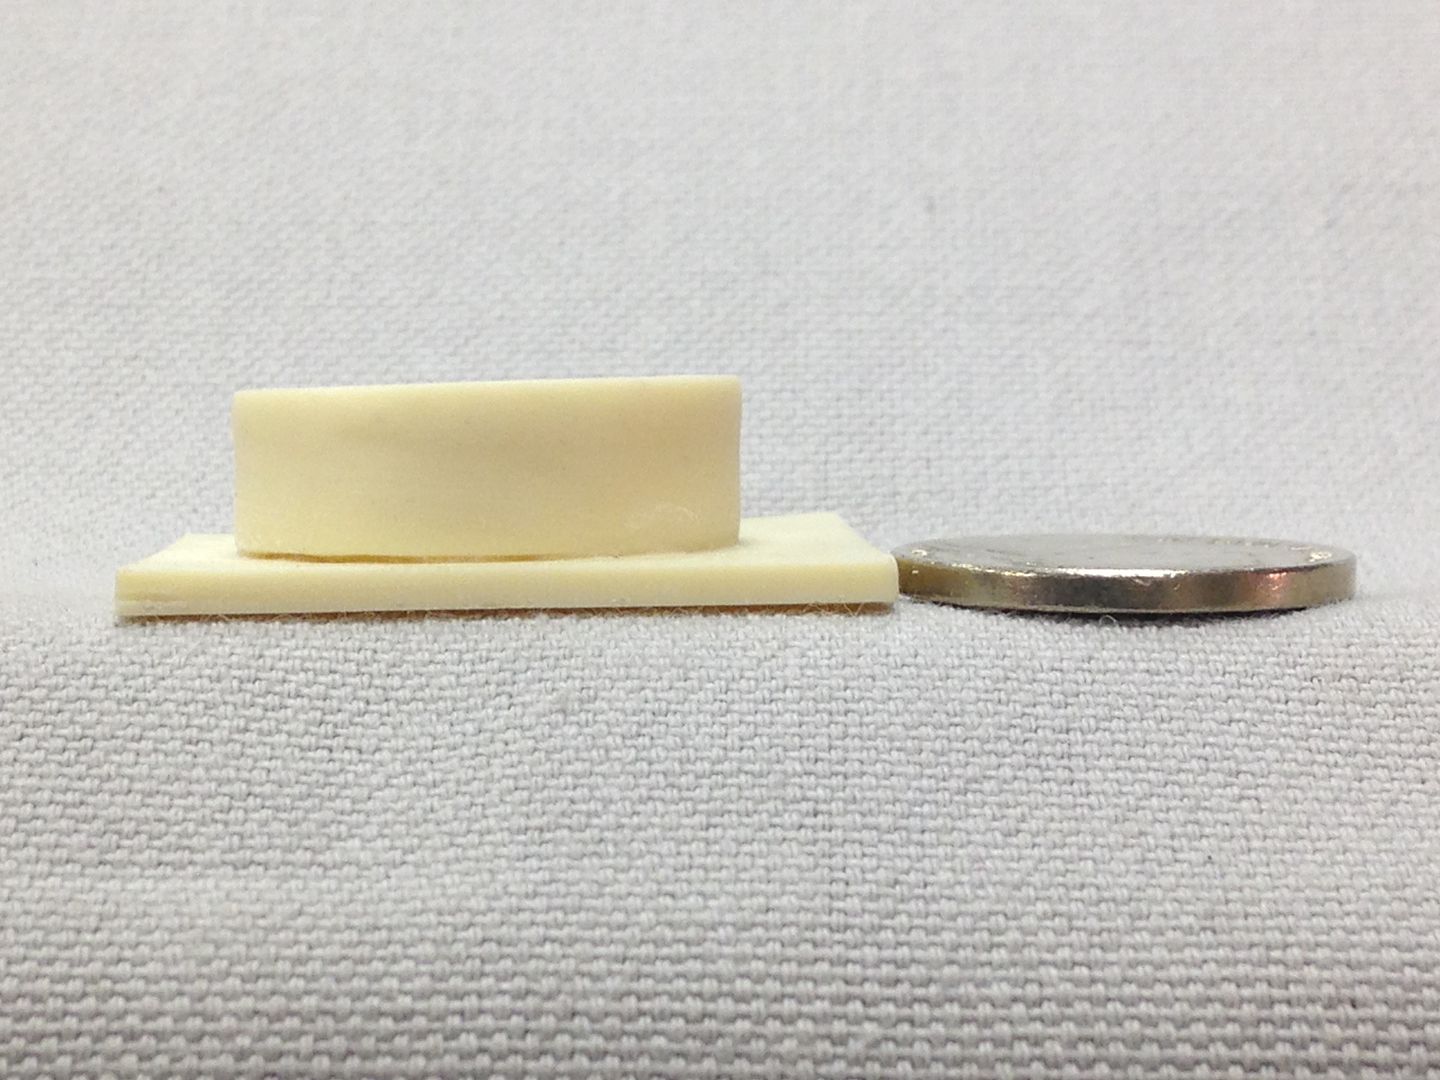
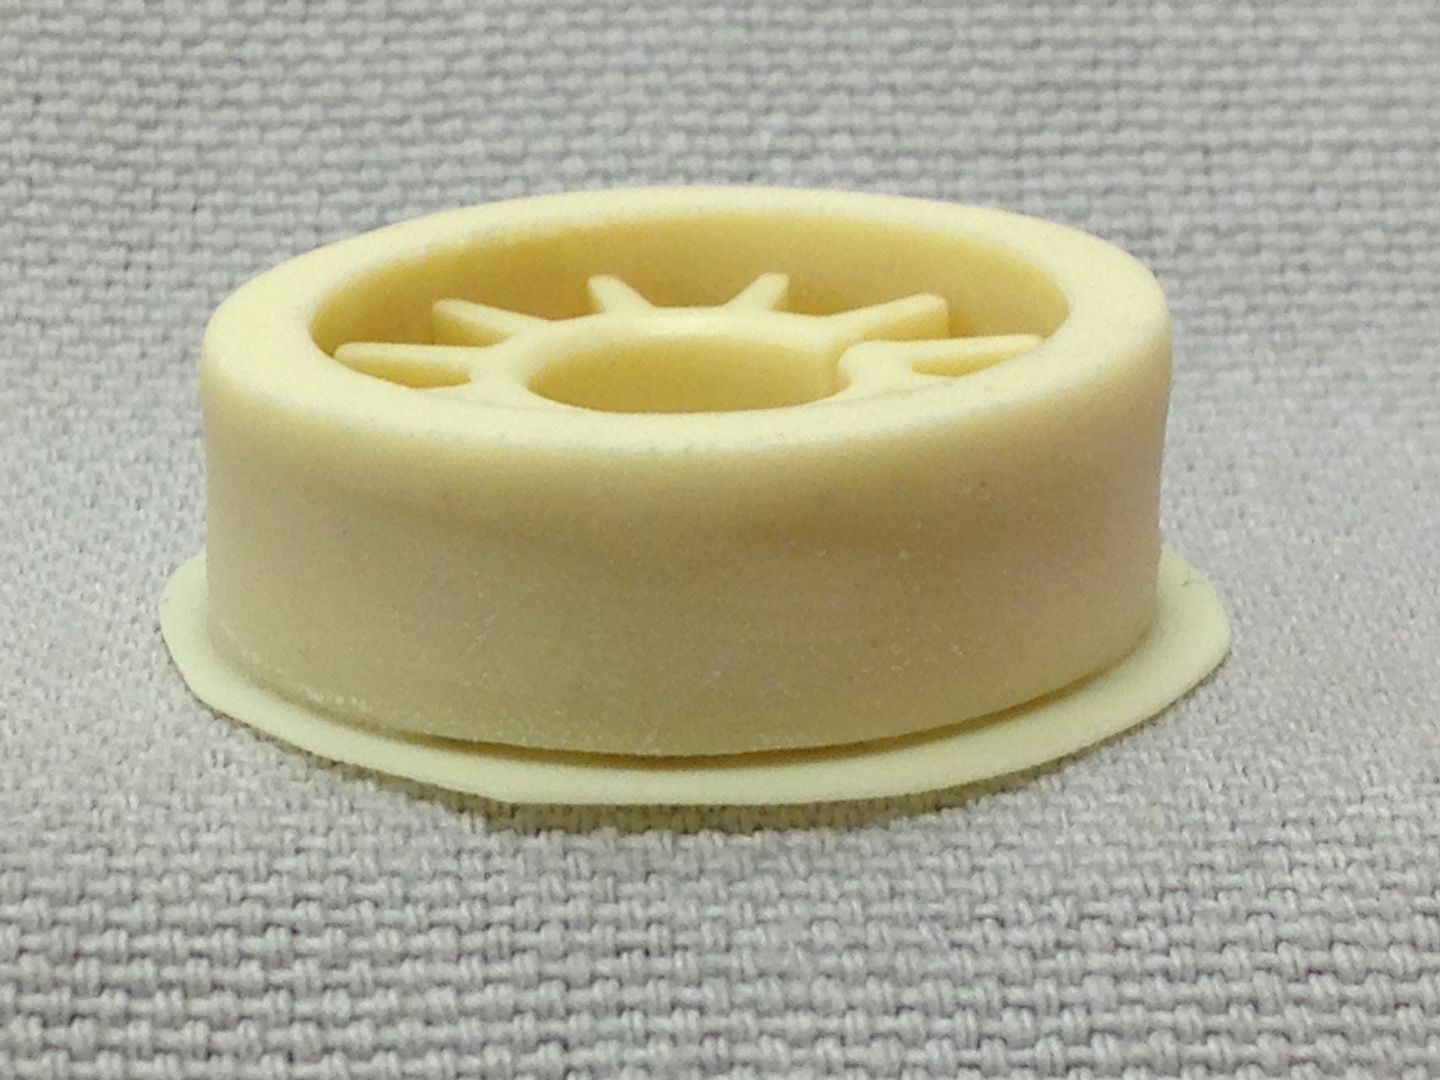
Beyond the kit, I've been collecting building materials and asking questions. I decided a good way to get more comfortable with this project was to start by removing the flashing from all the pieces. By starting here, I figure I can get familiar with all the parts and maybe the build will seem less daunting. For the most part, it's obvious where flashing needs to be removed. I learned flashing can be removed with nail clippers (I wouldn't have thought of that on my own!). I've also used an exacto knife, needle files and fine sandpaper. Some parts are molded on thick bases. I was advised to use a razor saw, but I feared cutting into the part. Instead, I used a small pair of diagonal cutters to nip away at the resin "bases" until close to the part, then used a benchtop belt sander with a 120 grit belt to CAREFULLY sand each part to the correct shape and thickness. Then I cleaned up any remaining flashing and finish sanded each part with 400 to 1000 grit sandpaper. Here's an example:

"Bases" on engine exhaust details (next to a US nickle for size reference).


In the process of nipping and sanding.


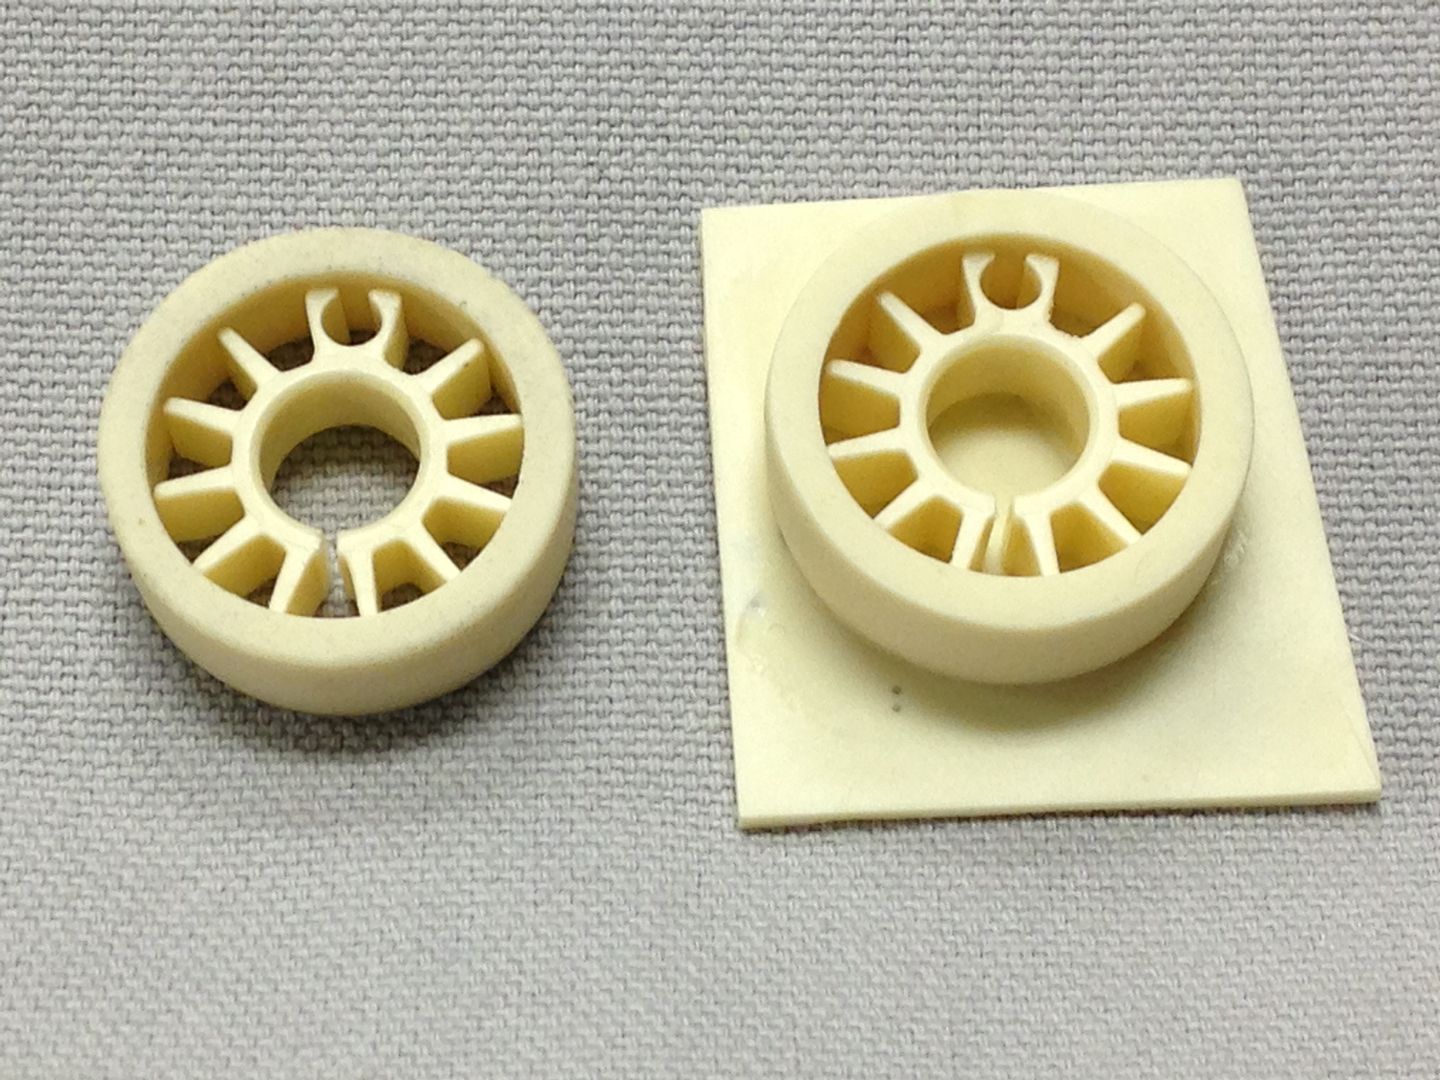
Completed part next to an untouched kit part.


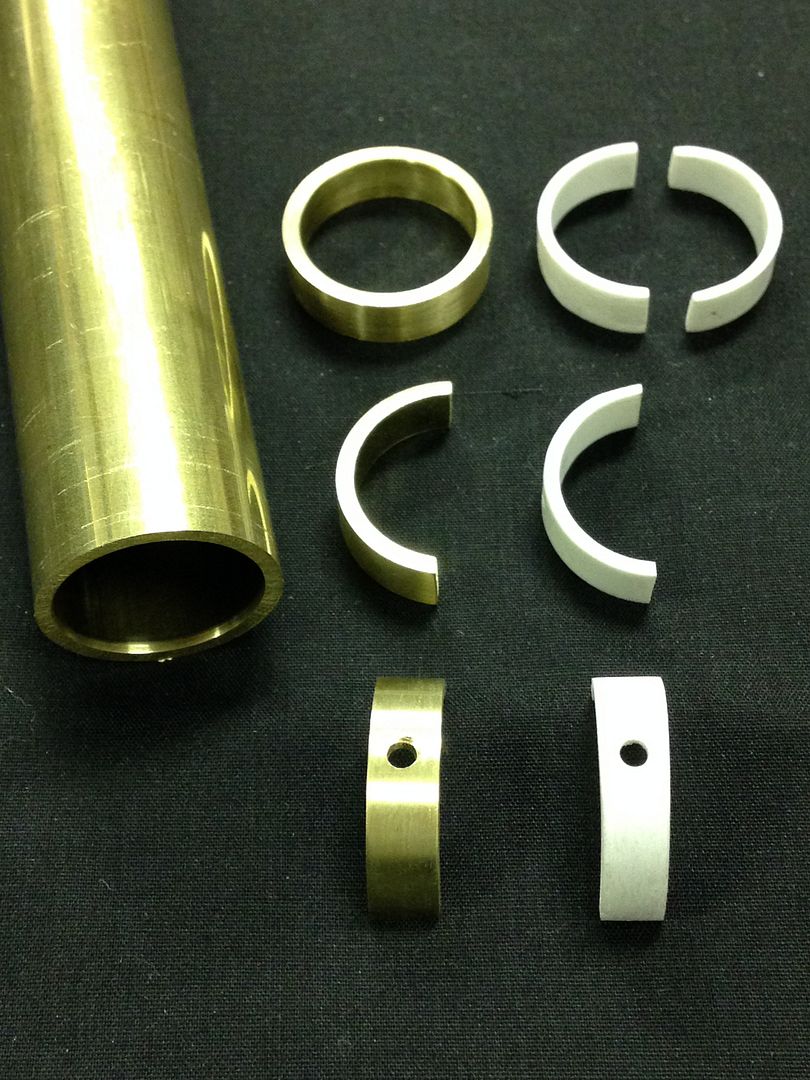
To keep my V4 build going, I decided to work on one part each night. Towards the end of the day, I clean up other projects, choose a V4 part, look through reference material and do any required detailing. I don't feel like I'm ready to glue anything yet, but figured I could start piecing together smaller assemblies. The engines/cans/intakes seem a little complicated, so I decided to start with the laser cannons. The V4 lasers are a nice resin/brass hybrid, but after reading about how the originals were built, I wanted to have a go at making brass lasers. If it doesn't work out, I can always go back to the V4 pieces. I bought 3 foot pieces of all the required brass tubing for about $40. I also want to try a little experiment with making the C-shape "flashback suppressors" from brass tubing and silver soldering them to the tube before attaching resin parts.

The C-shapes near the tips of the lasers seem like a fairly prominent feature for an X-wing, so I'd like them to be as consistent as possible with regards to thickness and shape. With some reference measurements, I made two prototype brass flash suppressors from a piece of 7/8" brass tubing (0.875" OD x 0.065" wall). To do this, I cut a ring about 1/4" wide, then sliced that in half to make two C-shapes. Then I drilled a 3/32 hole in the part and deburred everything. I sanded the edges until the width was very close to the V4 parts. Here's the V4 C-shapes along with my brass replicas.


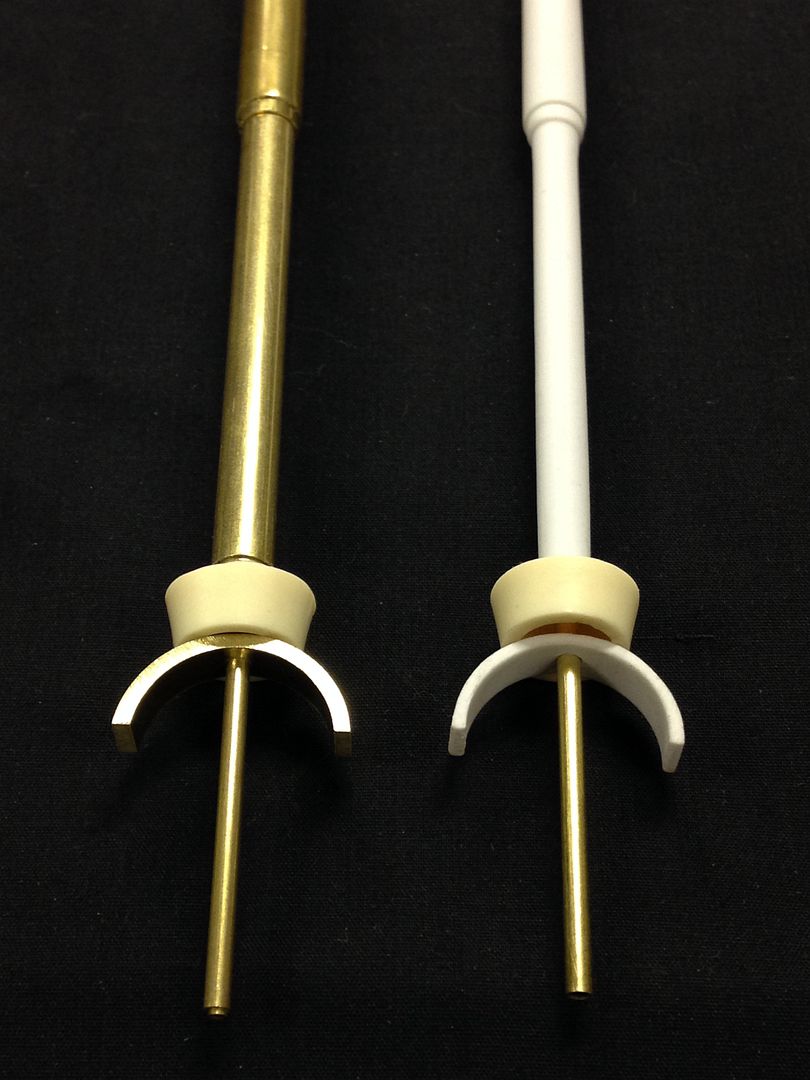
Next up are the brass tubes for the lasers. I fitted all the telescoping tubes together, then mocked them up with resin parts to see what they look like.


I could just make the lengths the same as the V4 parts, but I also need to know how far to insert them into the cannon bodies.
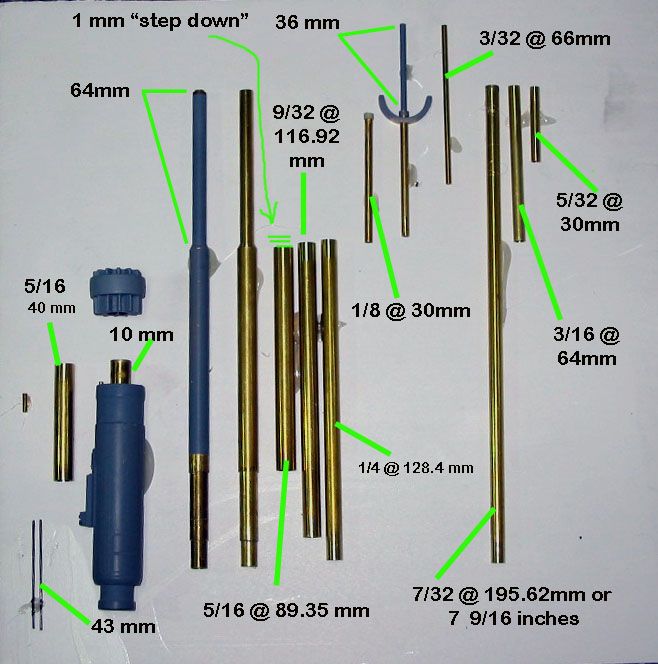
I have a brass tubing reference I found in an older build thread (thank you to whoever posted this!).


Beyond the tubing reference, I scaled several cannon body pictures to match the size of the V4 cannon bodies, pasted them into a single drawing and took measurements. There's a bit of variation, but that might be caused by focal length of the pictures or photographic perspective. I figure I might be able to average the variations together and come pretty close to the actual measurement. So far, most measurements are also close to the tubing reference. Hopefully, this doesn't mean I'm becoming a nutter...

Maybe the laser tubing length varied a little between all the X-wings? Does anyone have accurate measurements for a Red 5?

Once I'm satisfied that I've given the measurements due diligence and the lasers are the correct length, I'll set the tubing and silver solder the pieces together near the inner ends to prevent movement.


Thanks for reading! I'll post more updates as I get further into this! Aaron

HELP! Need to paint an M.R. Enterprise.

$
0
0
Need some professional advice gentlemen.

I have a Master Replicas Enterprise that hit an ion storm (fell off the table and broke the saucer off)
It was repaired in dry dock (re-glued, re-enforced and sanded while sobbing quietly)
Now it needs to be repainted.
I tried to color match it by eye but I am not sure.


Any suggestions?

Click image for larger version. 

Name:	pain 01.jpg 
Views:	24 
Size:	1.23 MB 
ID:	438604
Click image for larger version. 

Name:	paint 02.jpg 
Views:	27 
Size:	1.00 MB 
ID:	438605


Appreciate any advice.

Thanks guys.

:)Spockboy
Attached Thumbnails
Click image for larger version. 

Name:	paint 02.jpg 
Views:	N/A 
Size:	1.00 MB 
ID:	438605   Click image for larger version. 

Name:	pain 01.jpg 
Views:	N/A 
Size:	1.23 MB 
ID:	438604   Click image for larger version. 

Name:	IMG_1138.png 
Views:	N/A 
Size:	802.4 KB 
ID:	438603  

Viewing all 974 articles
Browse latest View live